When my father was a child, he shared a home not only with his
parents, but also seven brothers and sisters. Living in Grand Island,
New York, in a small suburban house, his large family often struggled to
make ends meet. Throughout my own childhood, I was the audience for
countless stories from my father’s youth. Stories that, with their
“When I was your age”
slant, were often invoked to show me how lucky I was. There was the
time when my father worked as a farmhand, picking peas in the freezing
cold rain. Or the time when all he received for Christmas was a coloring
book from the local pharmacy. Still, although space and money were
tight, my father and his family always managed to make do with a bit of
hard work and imagination. For all the stories that involved struggle
and hardship, there were more filled with creativity, kinship and
warmth. There was, for example, the time that my father and his seven
siblings built forts in the woods behind his house. There was also the
time when, in lieu of an actual Christmas tree, my grandfather built one
by tacking Christmas lights to the wall in the shape of a tree.
The last story was often told as my family readied our own Christmas
tree for the holidays. As my sister and I impatiently wrapped strings of
twinkle lights around pine branches, my father would remind us of his
own father’s quirky ad-hoc tannenbaum. To celebrate this tiny bit of
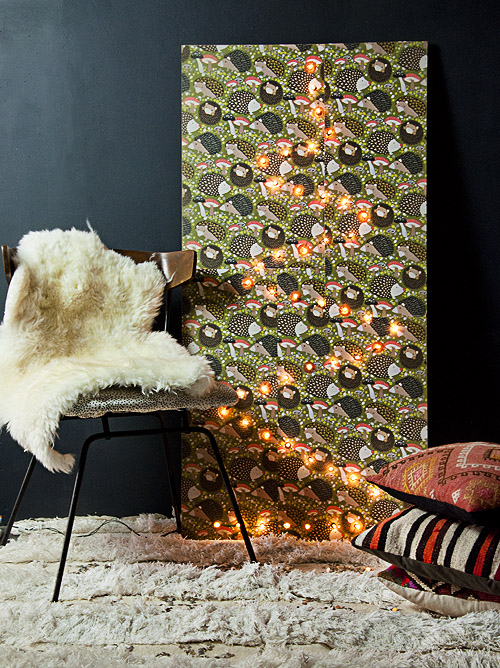
yuletide ingenuity, I decided to construct a similar “wall tree” —
albeit one that is slightly more dressed up — from a few basic
ingredients. The results are surprisingly charming and took only a few
hours to achieve. A great alternative for people with pine allergies,
this “tree” would also be wonderful for people who travel frequently,
college students or first-time apartment renters. For full directions,
continue reading after the jump!
Materials
- a panel of MDF (The one I used was pre-cut at Home Depot.)
- a string of Christmas lights
- wrapping paper or wallpaper (I used a few sheets of Paper Source’s hedgehog gift wrap because it reminded me of an updated version of medieval “mille-fleurs” wall tapestries.)
- glue sticks or spray adhesive
- gold craft paint
- a paintbrush
- cardboard or cardstock
- an X-Acto knife
- a power drill
- a drill bit that is roughly the size of your Christmas light bulbs
- masking tape
- duct tape
Directions
1. Glue your wrapping paper onto your MDF panel using spray adhesive or a glue stick. It’s okay if pieces overlap.
2. Lay your panel flat on the floor. Place your Christmas lights on
top of your panel and stagger them in a zigzag as you would for a
Christmas tree.
3. Tape the corners of your Christmas lights to the panel with masking tape.
4. Demarcate where your lights will be by making a small pencil mark on your panel in the location of each light.
5. Remove tape and lights from your panel.
6. Lean your panel against the wall and, with your power drill, drill
holes into each of your pencil marks. When completed, clean excess or
torn material from the back of your panel.
7. Lay your panel on the floor again.
8. With a piece of cardboard or cardstock that has a 1-inch circle
cut from it, stencil gold craft paint over randomly selected drill-holes
on your panel. Although this step isn’t necessary, it provides a nice
shimmering background to some of your lights.
9. Lean your panel against the wall, back side facing out.
10. Insert your Christmas lights one at a time into the holes you
drilled in the panel. Be sure that the end with the plug is at the
bottom of your panel.
11. Secure your strand of lights to the back of your panel by placing duct tape over the cord between lights.
12. Plug that thing in! You’re done!


Comments
Post a Comment